
Shader Museum
Summary
Shader Museum was a 2-week class project I completed in 2021. As part of a class called “Small Game Studio” at UC Davis, we were given freedom to choose a topic to explore for our final project. I’d always wondered: how do games make water? Grass? Highlights? Though I didn’t realize the true depth of my questions, I dove headfirst into the topic and discovered one of my loves in gamemaking: shader design!
I was also challenged by my professor to make something that was specifically usable by the wider itch.io development community. So this project was my first real experience with trying to not only learn these topics, but also with trying to explain how to use the tools that I’d produced. It really shaped my total experience with the project—I needed to make something that wasn’t just a massive sprawl of dense nodes—and gave me an appreciation for and fascination with the process of tools development.
Due to this project’s age, I’ve lost much of the source material. I was really new to game development at the time, as this class was actually my first time using a game engine at all, and so I didn’t really pay any thought to maintaining documentation for myself. I have still done my best on this page to document as much of the process and thought behind these shaders as I can.
Project Details
Shader Museum is a two-part deliverable: it is both a small game level that showcases and explains some of the features in the shaders, and a Unity package to download the shaders. It also comes with a README to explain how to use and install the package.
Features Overview
- Water shader, designed to look cartoony with defined, voronoi-based ripples, and very gentle wave movement
- Grass shader, which comes with a grass prefab I made, that gives the grass prefab wind motion
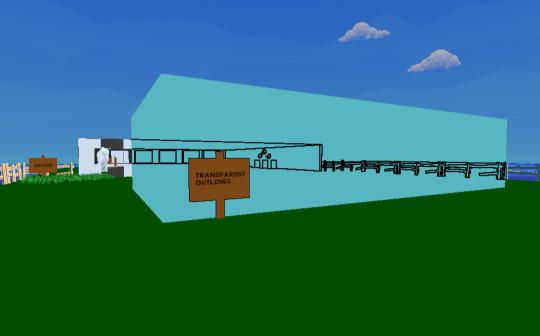
- Outline-based shaders:
- One that turns the object it is applied to into a transparent surface that draws silhouetted objects behind it with outlines
- One that turns objects behind the view-pane object (similar to above) into simple silhouettes
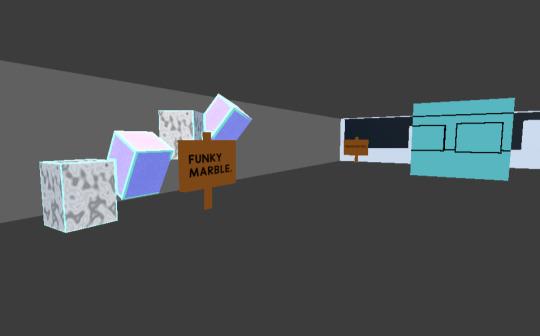
- And one shader that applies regular outlines to the object it is applied to, with an additional shader-defined object texture that looks a bit like marble that can be optionally turned on
Development Process/How It Works
Since this was my first time learning about shaders (I hadn’t even heard of them up to this point), I had a lot to study. There were a lot of basic questions I had to answer. What are shaders? How do they work? How do I make them in Unity? What can they be used to make?
Alongside the study load, I also had run into a bit of a problem: I really struggled with programming. I’d had very little experience with it up until this class, and so I just did not have the exposure to logic and algorithmic design I needed to achieve some of my ideas. However, my professor introduced me to my project’s saving grace very early on: ShaderGraph!
I’d decided I wanted to learn how to make water, grass in the vein of something like Breath of the Wild’s grass shader, and outline effects.
I didn’t have much of a plan, but my general approach looked a little bit like this:
- Look up a tutorial on the particular subject for the day
- Try to emulate it
- Try to figure out how to add new things to it
- Continue study
I realized very early on that the set of shaders I’d chosen were much more difficult to put together than it seemed. My primary source for the first shader I worked on was Brackeys, whose water shader tutorial I followed closely. I didn’t really understand what “voronoi” was, what “object space” meant, or why the power function made the voronoi cells look thicker. Much of my time was spent moving nodes around, finding new nodes, and trying out plugging various things in together until it broke or no longer looked like water. Here’s a video from part of that development process as I began to diverge from the basic Brackeys water look:
By this point, I was getting a feel for making simple, cartoony water, and moved on to grass, which I found much more complex. I couldn’t really find anything that was about making grass with ShaderGraph—only through HLSL. I didn’t know what HLSL was, nor did I realize that what I was looking at was manipulations on mesh vertices within the geometry pass. So I had to simplify.
I did a lot more research, and I learned that I could use vertex displacement to make the grass look like it was moving in the wind. All I needed was a grass prefab, which I drew up the texture for in Procreate, and a way to make the resulting planar mesh wobble. I found a tutorial that explained how to use nodes like Gradient Noise and Time to make a waving effect. Then I learned how to combine those with manipulated UV coordinates to make the grass wiggle more at the top than at the bottom. Here’s a gif of the final result:

The final step was the outline shaders. This was extremely challenging for me. I had a few specifics that I wanted the outline shader to accomplish: I wanted it to be able to outline cube shapes, and I wanted to have the outlines be along every edge of the object. I’d read about Fresnel effects early on in this process, but it wasn’t the kind of effect I was looking for. It was too soft, and it didn’t have defined edges.
I came across work from Alexander Ameye and Daniel Ilett that was able to help me get a grasp of… some of how it worked. My three outline shaders utilized a lot of external code from these two creators. I cannot say that I really understood how they worked, but I was able to piece together enough—such as the necessity of a custom rendering pass for my full outline shader—but it was just too much information for such a short time period. My development process for these three was essentially “copy code, stare at it, tweak some values, and move on”. I’d learned about the concept of edge detection, and that was about as much actual knowledge I’d gained from the experience.
But I still accomplished making them! And, despite how much I struggled with outlines, I do still love the end results, because I know how much effort went into them!
Here are some images of the three shaders in action:

The second-to-last step was to write the README, which was relatively simple, and I mostly listed out what each variable did for each shader, and noted important installation steps. Then, finally, I got to make the demo level, which was a lot of fun! I was studying Art History as my bachelor’s at the time, and I was really into museum architecture. I designed the level like a little open-air exhibit, with fences as plaques that players could walk up to and get a pop-up UI explanation of what each shader did, and their features.
Here are a couple screenshots of the final level:
Reflections
This project was my first exposure to the world of graphics programming. Realizing how truly deep the rabbit hole went was daunting and exciting. I spent time briefly convinced I would abandon game design entirely for this field of study, but I realized how much I loved the broader process of game development, and I was still so new to all of it. There was so much to explore! Unfortunately, I wouldn’t come back to shaders or graphics for a few years. My MFA was demanding, and I had little time to focus on anything outside of my coursework. But I loved shaders. Their vastness and beauty and the sheer amount of creativity that could be expressed through them fascinated me.
Looking back, I could say I wish I’d committed to one particular shader, and focused on making it really polished and deep. But I think the breadth of the project was important for me at the time. I was still learning what shaders were, and I needed to see how expansive the world of shaders really was. I think I made the right choice. I love this project so much, and I am so proud of what I accomplished in just two weeks with no prior experience. It gave me a foundation to build on, it gave me confidence that I could tackle complex problems, and it gave me joy, and I am grateful for that.
I’m happy to say that I’ve now come back to studying and building projects in this field since graduating, and as I continue to learn, I find myself looking back on this work with ever-growing love and appreciation. Shader Museum radiates with the excitement of a beginner, and I think that’s something truly special.
Resources
Some of the resources I used while making this project: